If you want to get around the limitations of WED and start making levels with curved surfaces and organic shapes, you are going to have to start using a modeling program to generate those tricky bits for you. You'll also find that level creation using a modeling program is easier, faster and more enjoyable. You might not always want to make all of your levels in a modeler though, as this method can generate a huge number of portals if you are not careful. Also you might want to take a level you have made in WED and add detailed features to it that would have been nearly impossible in WED.
This tutorial covers using Lightwave, Ultimate Unwrap and Med to edit, to export and import your levels with 3d Game Studio. You'll need Lightwave 7.5 or higher with the MAP export plugin from Greenbriar Studios, a current version of Ultimate Unwrap, and, of course 3d Game Studio.
Lightwave (MAP plugin) >>>WED(Load map file)
WED(build as entity) >>>MED(save as map)> >>>Milkshape(save as lwo) >>>Lightwave
As you can see, it is currently more troublesome to get your level into Lightwave than it is the other way around. You will also lose any texturing or flags that were set in WED.
Let's quickly go over the steps. We'll start with exporting the level you've made in Lightwave to a MAP file using David Mathews' Lightwave 2 Map plugin.
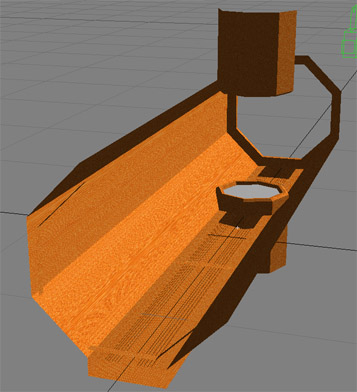
Firstly, load the model file of the part of the level that you want to export into Layout. Here, I've loaded the walls of a security room for a game I'm developing:
Go to Scene>>>Generics>>>Export MAP. Set you path, filename and make sure Round Points is checked. If you have made you level to scale, set your scale slider to 1. For more detailed information on what the other boxes do, check Greenbriar Studios homepage. Now, assuming you haven't gone too crazy with your geometry, you should now be able to load your level into WED.
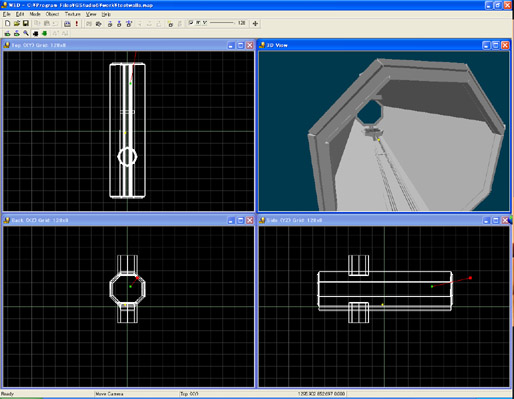
In WED, go to File>>>Open and click the pulldown arrow on the file type field. Select Level Files (*.map... and you should now be able to find the name of the level you've just created. If you get an error loading it, just select "yes to all." Here's what the above Lightwave object looked like:
If the geometry looks screwed up, try exporting again using a higher or lower scale. You'll find that the default light in Lightwave will be included in your level. You'll probably want to delete this. I still use WED for texturing and lighting, as the exporter isn't very reliable as yet in this regard.
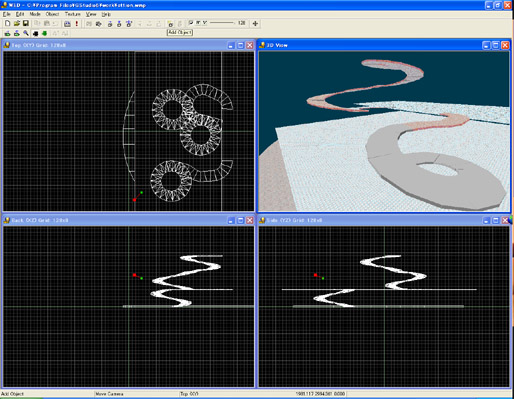
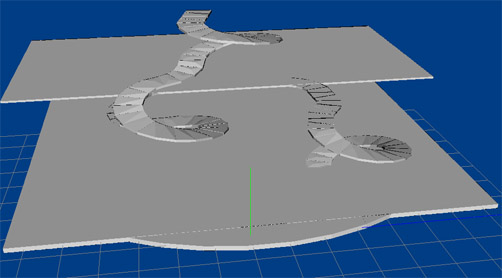
Now, let's say you have a level you want to take out of WED and spruce up in Lightwave. Here's a picture of a level with spiral ramps that I wanted to put a geosphere roof over:
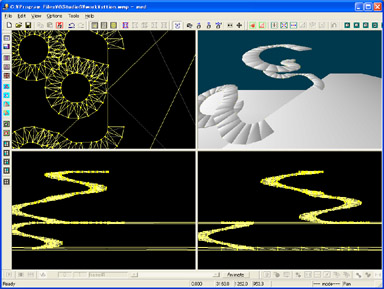
The first thing is to do a build of the level as a map entity. Go to MED and open the resulting WMP file. You can now see your level as a model:
Save it out as an MD5 file. You can now use Ultimate Unwrap as a go-between to import your level.
It is now a simple case of saving the file as a .lwo. I used to use Milkshape for this step, but since I upgraded 3dGS to version 6.2 and Milkshape to 1.7, I can't seem to load MD5s anymore. If you can get Milkshape to load and export your MD5 models, keep the scale to 1/1.
That's it! You now have your unfinished level in Lightwave ready to be edited. When you are ready to export it with Lightwave to Game Studio plugin (from Layout, of course), set the scale slider to 1. That way when you open the level back up in Game Studio, it will still be the same size.
Here, I'm going to tell you how I've found it best to make levels in Lightwave.
Firstly, a few things to consider. Map files do not like concave shapes or non-planar geometry, they do like right angles and boxes. Of course, we are trying to get around making our levels out of boxes, which why we are using Lightwave. The Lightwave to Game Studio plugin has the advantage of being able to break the geometry into BSP legal slabs. To ensure that you do not have any non-planar surfaces is as easy as performing a triple on the geometry. This way, there is almost nothing you cannot make that won't export with the plugin. It is still best to avoid sharp angles, as these can cause problems in WED.
A quick guide for scaling your levels. Thanks to the scale slider, you can make your geometry about any size, however if you want to know how big it will be when exported to WED, here is the answer. 1 quant in WED will become a massive 1 meter in Lightwave. That means that one medium cube in WED will become a 128X128X128 meter cube in Lightwave. When you export that cube back to WED with the scale slider set to 1, it will still be a medium sized cube (except it will be hollow unless you selected "assume legal" because the sides have been turned into slabs). It is a good idea to work to scale like this. I find you get less errors. Models are also at this scale.
When you make your rooms, have the normals facing inwards. This enables you to see through into the rooms and is also the side that will be flush when the model is imported to WED (unless you click the "flush inside" option on the plugin). Try to keep geometry planar as much as possible, as this is more WED friendly. Remember, tools like weld can offset points slightly. The more crazy you are with your geometry, the more likely you are to have trouble with it, or a very high portal count, in WED.
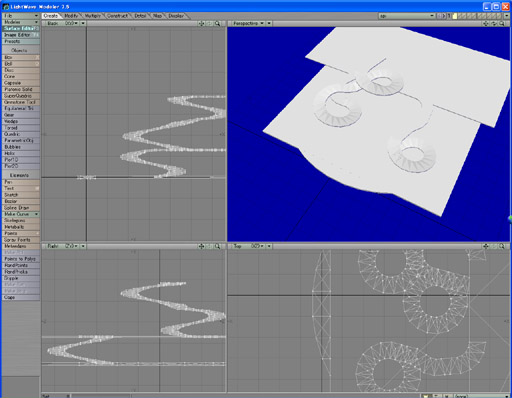
Build your level on layers. For the level with the spiral ramps that I used as an example above, I kept the imported geometry on a separate level my addtions. That way, I could export out only the additional geometry and merge it with the incomplete level in WED. Let's take a look at it:
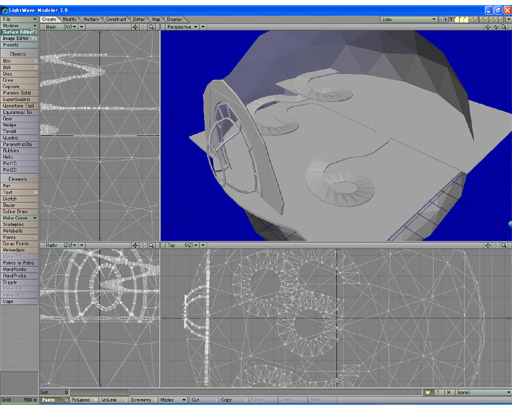
As you can see, I've enclosed the incomplete level that I started in WED inside a geosphere and added a large oval window. This level was built on three layers:
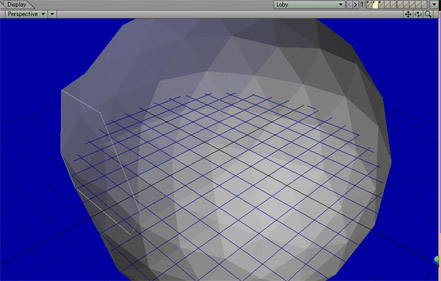
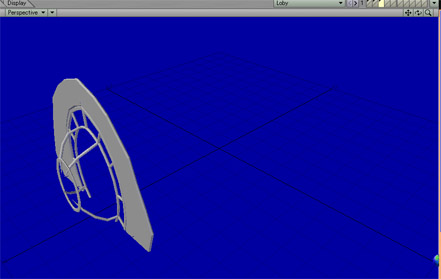
The sphere I wanted to export as MAP, and the more complicated window as a model. It's a good idea to export complex objects as models where possible, as they create a large number of portals and can cause errors in WED.
From here, I saved each layer I wanted to export as its own separate model. In this case I save the geosphere as one object and the window as another.
The next step is to bring the objects for exporting in one at a time into Layout. If you used the "save layer as object" option in Modeler, you 'll have to adjust the selection field to "all files" to see the layers you saved.
The window was to be used as a model, so I used the MD7 export plugin from Greenbriar Studios to do the job. Then, I loaded the sphere and went to Scene>>> Generics>>> Export Map. Below are the settings I used:
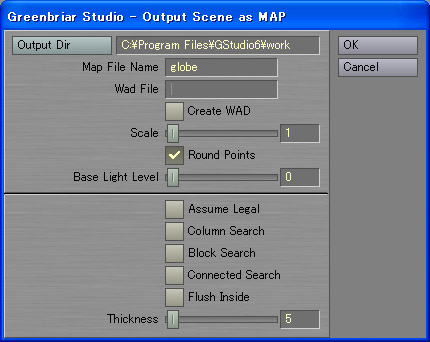
I selected 1 for scale in order to make it the same scale as the level I exported from WED. Click "Round Points" to prevent hairline cracks in the level in WED. You can adjust the thickness of the slabs with the Thickness setting. The thickness is measured in quants. 2 is the minimum thickness, as Game Studio is not accurate enough to handle blocks of one quant thickness very well.
You can now load all the different elements together in WED to make your level. You can open the geometry you have exported as MAP by going to File>>> Open and adjusting the file type to "Level Files." If you want to add a map file to an existing level, go to Object>>> Load Prefab. Load your models as usual by selecting Object>>> Add Model.
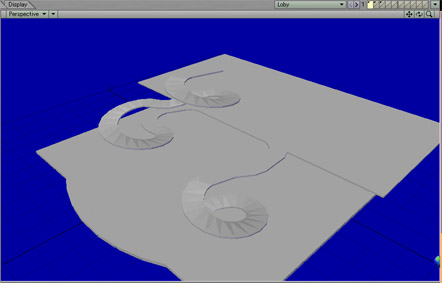
The items that you saved out of Lightwave using the Lightwave to MAP plugin or the MD7 plugin will pop right into your level at the right scale and rotation, all ready to go! As you can see, I've added a bit more geometry in WED after building this one (the animated figure was also exported from Lightwave with Greenbriar's LW to MDL7 plugin):
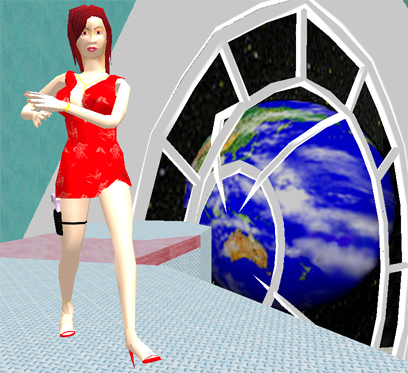

The textures and lights were also added after bringing the level into WED, as so far I've found the texture and light export of the plugin to be not so reliable. Though that may have changed by the time you read this.
So, there you have it. The Lightwave to MAP plugin allows you to add a lot more imagination and interest to your levels quickly and with little technical skill. You'll have to play around with it a bit to find out its full abilities and limitations, but I hope this tutorial has got you off to a good start.